Wednesday, April 27, 2016

Beginning Check Writing and Banking

Today we're going to begin a unit on using a checking account.  First we'll do a math worksheet going over percentages, decimals, and writing amounts out in longhand. (I will be handing out a copy in class, but you can get a copy here)

Next we will explore the general layout of a personal check:

Finally we will do a quick simulation of writing checks and using a check register.  I will be passing out a worksheet with three checks and a register (you can view a copy here: Checks with Register).  Use the following scenario to complete your worksheet:
  • You begin your checking account today (12/02/16) with $135.72 from your piggy bank.
  • You receive a Check for $550.00 from your work and Deposit it to your checking account on 12/03/16.
  • Write a Check for your rent on 12/04/16 for $425 to Jellico Green Apartments.
  • You go to dinner at The Pizza Spot on Saturday Night (12/05/16) for $18.27 and use your Debit Card.
  • You send a Check to Edward Teach in the amount of $31.19 on 12/06/16 for a pair of shoes you bought on eBay.
  • You receive a Check for $550.00 on 12/17/16 from your work and you Deposit it to your checking account that afternoon.
  • You write a Check for your car payment to Airport Auto Brokers on 12/18/16 in the amount of $224.72.
  • You use Online Banking to pay $124.25 for your Jellico Electric bill on 12/09/16.
Compare your ending balance with a neighbors to verify your accuracy.


Here are a couple video clips to explore:


RECORD ALL CHARGES OR CREDITS THAT AFFECT YOUR ACCOUNT
# DATE DESCRIPTION OF TRANSACTION PAYMENT / DEBIT DEPOSIT / CREDIT BALANCE
(-) (+)  $                 135.72
DEP 12/2 Deposit: Paycheck  $    550.00  $                 685.72
101 12/3 Rent: February  $     425.00  $                 260.72
ATM 12/4 Dinner at Pizza Spot  $       18.27  $                 242.45
102 12/5 Edward Teach: Ebay  $       31.19  $                 211.26
DEP 12/6 Deposit: Paycheck  $    550.00  $                 761.26
103 12/7 Airport Auto Brokers  $     224.72  $                 536.54
OL 12/8 Jellico Electric  $     124.25  $                 412.29

Monday, April 25, 2016

If You Think You Can...

"If You Think You Can, You Can"
Denis Waitley from “Seeds of Greatness.”

You can be a total winner, even if you're a beginner,
If you think you can-if you think you can, you can;
You can wear the gold medallion, you can ride your own black stallion,
If you think you can-if you think you can, you can;
It's not your talent, or the gifted birth,
It's not your bankbook that determines your worth;
And it isn't the color of your skin,
It's your attitude that lets you win!
You can upset McEnroe or Austin, win the marathon in Boston,
If you think you can, you can-if you think you can, you can;
You can profit through inflation, you can redirect this nation,
If you think you can, you can-if you think you can, you can.
It doesn't matter if you've won before,
It makes no difference what the half-time score;
It's never over 'till the final gun,
So keep on trying and you'll find you've won.
Just grab your dream and then believe it,
Go out and work, and you'll achieve it;
If you think you can, you can-if you think you can, you can.


Wednesday, April 20, 2016

Dave Ramsey: Saving and Investing

For the next few days we will discuss savings and investment strategies:
  • Complete the worksheets as we watch the movies.
  • There will be a quiz on this material next week.
        • You will need to know about emergency funds, mutual funds, compound interest, liquidity, single stock investing, pinnacle point, risk/return ratio, etc.
I know savings and investing is not something everybody wants to learn, but it can literally make THE difference in your future.  Imagine never having to have a car payment or not panicking if you had to buy medicine for your children or worrying if you got laid off for a month or two.  That's why Dave Ramsey refers to his program as "Financial Peace". 

Please give it a chance and I think you'll actually learn some important lessons.


Friday, April 15, 2016

Friday Funny: Where will you sit?

When you get on the roller coaster that we call life, you have to decide where you will sit.
I see this picture as an example of this idea, and I relate it to what you decide to do with your life.  For example:
  • The fourth row is sitting back and collecting a check from the government. 
  • The 3rd row is an entry level (i.e. fast food) job that gets you by.
  • The 2nd row is a good job with benefits and some vacation time. 
  • The front row is getting paid to do something you love, every day of your life. 
You don't realize it now, but life is much shorter than you think.  Find your passions and figure out how to work that into your career.  Work hard now and then coast through life enjoying the ride.

Wednesday, April 13, 2016

Photoshop Example: Restore Damaged Photo

We will spend today and tomorrow restoring a photograph.  I have actually done this as a side business (see http://www.restoredtreasures.com) and did pretty well with it.  The nice thing about doing this is that you make money, but you also save someones memories.

For today, select one of the attached damaged photos to repair and restore [or locate your own].  Remember to save the original to include in your portfolio as a "before and after".  If you do not include a "Before and After" (either as one image or by uploading both) I won't grade it.

This example comes from a press release from Utah (http://www.prweb.com/releases/2004/08/prweb149074.htm) in which they declare October 11th to be "Historical Photo Restoration Day".
Original
Restored
I will demonstrate the tools with this image:
Here are some examples of restored photos:
In this strange example, I combined the anaglyph project with a photo restoration to give the restored picture some depth.  You can see it if you use anaglyph red/cyan glasses.
Click on an image to view it full-size, then Right-click and Save As to your computer:


Sometimes I actually replace the original backdrop in a portrait.  Here are some examples:

Here are some video tutorials showing the basic process:


Photoshop Gondola Example

Assignment:  We have accepted an assignment from a client to take a dull, scanned photograph and improve it for use in a poster, brochure, web site, etc.  The client has scanned a photograph of a gondola, but they think it is too hazy... and they don't like the speedboat in the center of the picture... and "the colors are a little blah".  We will use PhotoShop to correct these issues... and more.

Photoshop Tools/Options Used:
  • Ruler
  • Rotate Canvas
  • Crop
  • Levels
  • Clone Stamp
  • Dodge
  • Burn
  • Replace Color
  • Magic Wand
  • Paste Into
  • Free Transform

We will be using the following images to create our final project:
(Right-click each image and save to your computer, then open them in Photoshop.)
Part I: We will begin with the Gondola picture (p_start.psd):
  • Select VIEW > FIT ON SCREEN (shortcut is CTRL+0) to see the image as large as possible
  • Select the RULER tool (sometimes it's hidden under the EYEDROPPER) -- a shortcut is SHIFT+I which toggles through that toolset.
  • Drag the ruler along an edge that should be straight (i.e. the edge of the tower).
  • Select IMAGE > ROTATE CANVAS > ARBITRARY...
  • A suggested rotation is already in place based on your ruler line (this tool is trying to make the ruler line vertical or horizonal)... so click OK.
  • Use the RECTANGULAR MARQUEE tool (the box shape) to select as much of the picture as possible without including the black border (it's okay if you don't get all of the photo in the square).
  • Select IMAGE > CROP
  • Select VIEW > FIT ON SCREEN (again, to see the maximum image size)
  • Select IMAGES > ADJUSTMENTS > LEVELS
  • Drag the "black triangle" in toward the very beginning of the "mountain range" -- and do the same for the "white triangle" (click the "Preview" box to toggle this change to preview what it is doing) then click OK.
  • You now have a brightened, cropped image to work with for the next part.
Part II: Removing the Motor Boat / Using the Clone Stamp
  • Click the CLONE STAMP tool
  • Move your pointer over to a clear area of water -- about the same distance/depth as your motorboat (i.e. somewhere in the same horizontal line) and ALT+CLICK.
  • Move your mouse over to the center of the motorboat and slowly paint over the boat.  Notice the "+" shape where the CLONE STAMP is copying from.
Part III: Adjusting Highlights and Shadows
  • Click the DODGE tool (it looks like a black pushpin) and set the Range for HIGHLIGHTS and the Exposure to around 10%.
  • Adjust your brush size as necessary with the [ and ] keys.
  • Brush over the red and white striped tarp and notice how the highlights are getting brighter.  Try this on other tarps and the side of the boat which seems to get shinier.
  • Click the BURN tool (it looks like a hand pinching and is found under the DODGE tool) and set the Range for SHADOWS and the Exposure to around 5%.
  • Adjust your brush size as necessary with the [ and ] keys.
  • Brush over the boats/tarps just to get a little contrast.
Part IV: Replace the Orange Tarp
  • Use the ZOOM tool (it looks like a magnifying glass) to zoom in on the orange tarp -- making sure you can see the entire thing.
  • Use the LASSO tool and draw around the orange tarp (making a selection)
  • Select IMAGE > ADJUSTMENT > REPLACE COLOR
  • Click on the orange part of the orange tarp.  You should see a faint "mask" of the orange shape appear in the Replace Color box.
  • Hold down the SHIFT key and Click and Drag around the orange tarp trying to select ONLY the orange areas.  If you over-select (i.e. you accidentally go into the black) you can start this step over.
  • When you feel like you have a nice, sharp "mask" of the orange tarps shape, drag the HUE slider left and right.  Notice the colors changing on your image.
  • If you adjust the SATURATION slider and the LIGHTNESS slider, you can actually match the colors of the other tarps on the boat.
Part V: Make Blue Skies From Gray
  • Open the Clouds picture (p_clouds.psd).
  • Click on SELECT > ALL (or do CTRL+A)
  • Select EDIT > COPY (or do CTRL+C)
  • Go back to your Gondola picture.
  • Click the MAGIC WAND tool (SHIFT+W toggles this)
  • Click in one of the "gray" areas of the sky and notice how it selects some of the building tops.  We don't want that.
  • Drop your TOLERANCE down to 10 and see how that works.  Notice that it [probably] doesn't select the entire piece.  We can compensate for that by holding SHIFT and clicking in the "unselected" areas.
  • Continue SHIFT-Clicking the other "gray" areas of the sky throughout the picture.
  • Select EDIT > PASTE INTO (not PASTE)
  • Notice how ugly and unnatural this looks?  Don't worry -- go over to the OPACITY setting (above your LAYERS) and drag that down until it looks natural.  Mine is about 37% [this time].
  • When you are satisfied with your final product, select LAYER > FLATTEN IMAGE.
Part VI: Make the Before and After
  • Go to IMAGE > CANVAS SIZE
  • Change "inches" to percent and change the width (since this is a picture that is taller than it is wide, a side-by-side comparison works best -- so we will adjust the width) and change the 100 to 200 (making it twice the width).
  • Click on the Right Arrow (this means you want your current picture -- the "after" -- to be on the right) and click OK.
  • Copy your original image (in this case, p_start.psd) and Paste it into your finished image.  Use the MOVE tool (the black arrow) to drag it to the left side.
  • You may want to use your FREE TRANSFORM to rotate and resize the original so it fits better.
  • Add your name to the finished image.
  • Save your completed file as a JPEG image to your Thawspace. 
Part VII: Add to Your Portfolio
  • Go to your Blog (http://www.blogger.com/) and sign into your account.
  • Click New Post and make sure "Compose" is selected.
  • Click the IMAGE/PICTURE button.
  • Browse for your picture (from your Thawspace).
  • Add a description about the steps you completed or the process you used in putting this together.  You could even add the reason you did the project (e.g. A virtual client wanted you to clean up an image to use for print/online media).
  • Click PUBLISH POST.
  • Click VIEW BLOG.
If you have difficulty following along and would like to work on this from home, here is a tutorial using the same images:


Photoshop Retouch Example

BASIC RETOUCHING

Today we are going to explore some photo retouching.  Next we will be creating a "before and after" picture to save to our portfolios.

First we will get an original source image to work with:
  1. Begin by right-clicking the image below and selecting "Copy Image" or "Copy" (depending on which browser you are using). 
  2. Open Photoshop and select FILE > NEW
  3. Select EDIT > PASTE
  4. Use the tools I demonstrate in class to touch up the photograph 


Next we will create the Before & After picture:
  1. Select IMAGE > CANVAS SIZE
  2. Change your settings to "PERCENT"
  3. Click on the "Right Arrow"
  4. Change your Width to 200% and click OK
  5. You should now have an image with space on the left
  6. Copy the original image (from this web page) again
  7. Paste the image into your Photoshop document and drag it to the left (as the "before" image)
  8. Use the Text tool to add your name to the image.
  9. Save your image to your Thawspace as a PSD and as a JPG
Next we will upload these pictures to our portfolio:
  1. Open your Blogger account (you may want to open Gmail and then go to http://www.blogger.com/).
  2. Select your "Portfolio" page.
  3. Click "New Post"
  4. Click the "Image" button in the post window.
  5. Locate and select your picture (the JPG version), then click "OK"
  6. Click on the picture in your post and select the size you want it displayed.
  7. Write a brief summary of what this project is about (either before, after, or on either side of your image).
  8. Click "Publish"
  9. Click "View Blog" (at the very top of your window)

Finally, choose another picture that you can retouch.  I'm attaching a couple examples, but you can select another image if you like.  (I recommend clicking the picture to view it full-size before copying it.)


Tuesday, April 12, 2016

Learn From Those Who Have Been There

About this project:

I think it’s important for high school juniors and seniors who are getting ready to start out on their own [whether it’s at college or in a job or both] to begin thinking about money and credit.  I also feel that it’s important to ask people who have really “been there.”  As an adult, if I want to know who has the best cell phone plans or the cheapest texting, I ask a teenager.  If I want to know the best new video games, I ask a teenager.  I do that because they have the experience to help me make a smart decision.  As a teenager, you should seriously consider who has the most experience getting out on their own, getting credit, saving money, being successful, getting in financial trouble, etc. 

That’s why for this project I want you to interview “those who have been there.”  You will choose people whose opinions you respect, and ask them a series of questions.  You will use the answers to these questions to write about what you have learned.

Instructions:
        
You will choose four people (men or women from different age groups) and interview them.
  • Take notes as they answer the questions – especially on things for which they offer advice.
  • Try to ask follow-up questions if you want to know more about a certain subject.
  • After each interview, summarize your experience (what was interesting, what were their reactions to the questions, what was surprising, etc.) in a paragraph.
  • Next week we will write an essay using these results and what you have learned in this class.

LEARN FROM THOSE WHO HAVE BEEN THERE

#1: A person between ages 18‐23 who has been on his own for over two years:
  • What kind of things did you buy before you started out on your own?
  • How did your spending patterns change when you were really on your own?
  • What do you wish you had known about spending or saving money when you started out?
  • How do you feel about using credit?
  • What were your parents/caretakers attitudes about borrowing money and being in debt?
  • What would you have done differently with your spending patterns if you started over again?
  • What advice can you offer a person starting out?
#2: A person between ages 24‐30 who has a family:
  • What kind of things did you buy before you started out on your own?
  • How did your spending patterns change when you were really on your own?
  • What do you wish you had known about spending or saving money when you started out on your own?
  • Now that you have a family, have your spending patterns changed?
  • How do you feel about using credit?
  • What were your parents/caretakers attitudes about borrowing money and being in debt?
  • What would you have done differently with your spending patterns if you started over again?
  • What advice can you offer a person starting out?
#3: A person between ages 35‐60:
  • What kind of things did you buy before you started out on your own?
  • How did your spending patterns change when you were really on your own?
  • How have your spending patterns changed since you were 35 years old?
  • What do you wish you had known about spending or saving money when you started out?
  • If you have a family, have your spending patterns changed?
  • How do you feel about using credit?
  • What were your parents/caretakers attitudes about borrowing money and being in debt?
  • What would you have done differently with your spending patterns if you started over again?
  • What advice can you offer a person starting out?
#4: A person older than 65:
  • What kind of things did you buy before you started out on your own?
  • How did your spending patterns change when you were really on your own?
  • How did your spending patterns change during your child rearing years?
  • How have your spending patterns changed since you were 60 years old?
  • What do you wish you had known about spending or saving money when you started out?
  • Did you use credit during your younger years?
  • What were your parents/caretakers attitudes about borrowing money and being in debt?
  • What do you wish you had known about spending or saving money when you started out on your own?
  • What would you have done differently with your spending patterns if you started over again?
  • What advice can you offer a person starting out?


(I will get you a copy of these questions so you don't have to copy/print)

Monday, April 11, 2016

Computer Lab: Day 1 (Accounts & Word Processing)

Don't forget to bring your draft references and résumé so we can type them up in the computer lab tomorrow!

Today we will be using the computer lab to create some Google accounts, explore the Google Drive, and use word processing software (one of the Google Docs).

Our projects will include:
  • References
  • Résumés
  • Email
To begin with, create a new Google Account (if you don't already have one).  This will be your email address, your Google Docs login, etc.  Sometimes Google asks you for a phone number to verify that you are a real person.  If you don't have a phone, you may have to borrow one from a friend for a few seconds.

Next we will look at Email.  You can either click the Gmail button in your Google Account or you can go to Gmail.com to access the tool.  You will send an email to: askgriff@gmail.com  and the subject of the email will be your name.  You can just type "Hello" or something in the email to get full credit for this assignment.

Résumé Template:  (Click Here)

Portfolio & Letters of Recommendation

Employment Portfolio:  

Requesting a Letter of Recommendation:
During the course of this class we are building our portfolio's to prepare for the future.  An important component to a good portfolio is a "Letter of Recommendation" (or several of them, if possible).  The big question is, "How do I ask for a letter of recommendation?"
  • First of all, make your request early:  Give the letter writer two weeks if possible.  The more time the writer has to think about your background and review the information you give him/her, the better job they will do in writing your.
  • Assemble the necessary materials:  Include a brag sheet or at least a list of your accomplishments and activities, the abilities or qualities you would like them to focus on, who the letter should be addressed to [if applicable], and a SASE (Self Addressed Stamped Envelope) if the letter is to be mailed back to you.
  • Choose good references:  You want to choose someone that has a good reputation, who writes well, who speaks highly of you, and who knows you fairly well.  Think before you ask -- don't ask a teacher for a letter of recommendation if you have a 'D' or 'F' in their class or if they have had to send you to the office for being disruptive.  Think of someone you have impressed or really "been there" for.
___________________________________________

PORTFOLIO CHECK:  When I do a portfolio check I will be looking for format, organization, and a variety of documents.  These are the sorts of documents I will be looking for when I do portfolio checks:

Format:
  • Nice / Professional Looking Binder
  • Sheet Protectors for Important Documents (Section One)
Section One (Your Portfolio):
  • Résumé 
  • List of References
  • Letter(s) of Recommendation
  • Awards or Certificates [Optional]
  • Transcripts [Optional]
Section Two (Interview / Application Prep):
  • Brag Sheet
  • Cover Letter: Ad Response
  • Cover Letter: Referral
  • Cover Letter: Cold Contact
  • Follow-Up Letter (To Job Application)
  • Thank You Letter (For Interview)
  • Sample Job Application (Completed As Reference)
  • Handshake Etiquette Handout
  • 25 Most Common Interview Mistakes
  • 25 Most Common Interview Questions
  • Questions to Ask During an Interview
  • Extra's (i.e. Notepad, Pen, Breath Mints, Deodorant, etc.)

Portfolio: Brag Sheet

Your homework is to ask a parent/guardian and a friend/family member for feedback about who you are, what your strengths are, etc.  We will use that information (and the experiences you have listed on your résumé) to create a "brag sheet."


So what is a brag sheet?

When applying for a job, a college, or a social program (i.e. becoming a foster parent) you need letters of recommendation -- a letter from someone you know who is willing to vouch for your character, experience, or skills.

The biggest difficulty in getting a letter of recommendation is asking someone and, of course, letting them know what it is you need from them.  What should they talk about in the letter?  What should they avoid?  Are there any achievements you would like them to highlight?  Are there other things you want them to know before they write your recommendation?

Today we will be creating a "Brag Sheet" with some of your history and accomplishments that you can give to someone when you ask for a letter of recommendation.

Required:
  1. Name as you would like it to appear on the letter.
  2. Address, Phone Number, and Email (similar to résumé)
  3. Do you have an intended major when applying to college?  What experience(s) have influenced this planned goal?
  4. About Me:  Create a bulleted list of six adjectives which you, your family, or friends would use to describe you.  Give an example for each.
  5. What are your proudest personal accomplishments?
  6. What do you choose to learn on your own time?
  7. Looking back at middle and high school, create bulleted lists of each the following:
  • Extracurricular (Student government, yearbook, music, drama, art, clubs, etc.)
  • Volunteer/Community Services
  • Sports (organized sports in and out of school)
  • Summer Experiences (Mission trips, summer travel programs (not vacations), etc.)
  • Awards/Honors (Includes school, regional or national prizes in any subject, sports awards, etc.)
  • Employment (Camp counselor, babysitting, tutoring, internships, jobs, etc.
  • Hobbies (Interests that are not organized, like reading [with a book list], computer programming, etc.  Be selective)
Recommended:
  1. Which course(s) have you enjoyed most?  Why?
  2. Which course(s) have given you the most difficulty?  Why?
  3. What positive factors (such as personal, family, summer experiences, teacher interactions) have contributed to your performance?
  4. Have there been events, circumstances or experiences which have had a negative impact on your academic standing?  (Moving, cultural differences, sickness, accidents, divorces, deaths, etc.)
  5. Looking back, how would you describe your high school experiences in the following ways:
  • Academically
  • Personally 
Notes:
  • List extracurricular activities and hobbies in order of their importance to you.
  • Everything else should be listed in chronological order, beginning with the most recent.
  • Keep your Brag Sheet on 2 pages (or even better, 1 two-sided sheet).

Thursday, April 7, 2016

How We See Ourselves

As we have discussed, when I ask you all to tell me about yourselves you often tell me, "I'm short" or "I'm skinny".  Who you are is different than what you are -- and quite often, "what we are" is often seen through a filter we have built for ourselves.  And we are generally more critical of what we look like than others are.


The Rule of Thirds

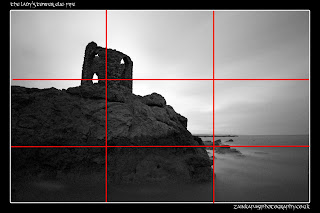
The most basic principle in photography, layout or design is The Rule of Thirds.  The basic idea is that you can divide your photo into an equally divided 3x3 grid with focal targets [sometimes called "sweet spots"] occur at the line intersections.  Photos that the human eye perceives as good or powerful tend to follow the Rule of Thirds.  Even the masters -- painters from hundreds of years ago -- used the Rule of Thirds... although it didn't really become a "rule" until photography came into being.  And even then... it's more of a guideline.  :)

So how do we use the Rule of Thirds in our own compositions?

If you were to look through a viewfinder or at a camera screen you can divide it into thirds by mentally making a Tic-Tac-Toe grid:

Many cameras have a grid or boxes or "corners" indicating where the "sweet spots" are in the photo:
Some phone apps (the iPhone Photo App, for example) have pre-built "Rule of Thirds" helpers:
The idea is that the human eye focuses most on the areas where the lines intersect.  So if we put the focal point of the photo in one of the intersections, the image becomes more attractive or interesting.
Another use of the Rule of Thirds is to place the subjects eyes on the horizontal line.  Ideally one of the eyes would be on one of the interesctions, while the eyes would be looking to the opposite side into the empty space.  This image of a cat is fairly close.

If you are taking (or cropping an existing) landscape photograph, the Rule of Thirds can be used to help add interest to the shot.  Sometimes the horizon line is on [or close to] one of the two horizontal lines.  Sometimes the picture can be divided into three areas -- the foreground, the focal point, and the background.  In the example below, the horizon line follows the bottom line while the subject of the photo is exactly on the interesection.
Here are a few more examples demonstrating the Rule of Thirds:

Now look at the following photographs and see if they follow the Rule of Thirds -- and if so, in what ways:


The Rule of Thirds is utilized in movies as well as photographs.  This is an example of a commercial with the Composition Lines overlayed on the movie.
This guy did a music video about the Rule of Thirds:

A more advanced explanation about the Rule of Thirds can be seen in the video below:

http://blog.muddyboots.org/2007/07/rule-of-thirds.html

http://www.everydayhdr.com/?p=1367